Home Services

What Does a Plumber Do?

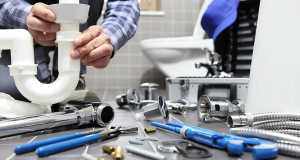
Plumbers install and repair pipes and fixtures such as toilets, showers, and sinks. They also work on plumbing projects at construction sites.

Medical professionals, first responders, and teachers may come to mind when most people think of noble professions. However, plumbers deserve much recognition for their hard work and dedication. Contact Gateway Plumbers of Aurora now!

Plumbing installation is a crucial part of new construction and home renovation projects. It involves laying pipes, connecting fixtures and testing for leaks. Professional plumbers have the skills and experience to complete these tasks safely and efficiently. They are also familiar with local regulations and standards.

Before starting a plumbing installation, the team will mark out where the lines will run and set their connections to the municipal water supply and the sewage system. This ensures that the water system is fully integrated with the city’s infrastructure. In addition, the team will install a main line that supplies water to the entire house. This requires careful planning to ensure adequate pressure without causing clogs or overflow. The plumbing systems will also include shut-off valves that allow individual access to specific parts of the house.

The above-ground rough plumbing phase involves installing drains, vents, and sewer lines to prepare the building for its internal plumbing structure. It also includes establishing water supply lines to all appliances and fixtures, such as sinks, toilets, showers, and faucets. Plumbers may also install gas and flue lines, depending on the project’s needs.

For new residential and commercial buildings, the plumber will work with architects, engineers, and contractors to design a comprehensive piping network that supports both the structure’s functionality and the building’s aesthetics. They will ensure that all pipes meet the necessary codes, are properly sized and secured, and provide safe, clean water for every fixture.

The plumber will also test the plumbing system for leaks and ensure that all components are functioning correctly. If any issues are identified, the plumber will make the necessary repairs. In addition, a plumber can offer advice on optimizing the plumbing system and reducing water waste. They can also recommend energy-efficient products and fixtures.

Commercial and Industrial Buildings

Unlike residential plumbing, where plumbers usually work on systems within private homes, commercial and industrial settings have different requirements. These larger environments may require more extensive piping, as well as sophisticated equipment to manage water flow and temperature. Additionally, plumbers who work in these settings must be able to interpret blueprints and building codes to properly install and connect fixtures and appliances.

These professionals also work closely with other building professionals, including architects and construction teams, to ensure that plumbing systems are integrated seamlessly into new structures. They may also be responsible for maintaining existing systems and repairing or replacing components. In some cases, this can involve working on complex industrial plumbing systems, such as those found in manufacturing plants or power stations.

Plumbing systems are critical to the safety and comfort of occupants in commercial and industrial buildings, so they must be maintained in a safe and functional condition at all times. When problems arise, it’s the responsibility of these skilled tradesmen to identify and resolve issues quickly and efficiently. This often requires attention to detail, physical stamina, and the ability to work with a wide range of tools.

Plumbers who specialize in maintenance and repair often work on call, responding to requests from clients when they notice problems with their plumbing systems. This can include leaky pipes, clogged drains, and malfunctioning water heaters. These plumbers use their knowledge of plumbing codes and regulations, as well as their problem-solving skills, to determine the source of the issue and make repairs.

In addition to technical knowledge and practical skills, plumbers should have excellent customer service and communication abilities. They must be able to explain complex plumbing issues in layman’s terms, and they should be willing to travel to client sites when necessary.

Those interested in becoming a plumber can start by completing a vocational school or community college program that offers courses in plumbing and related trades. They can then pursue an apprenticeship, which combines on-the-job training with classroom instruction. Apprentices learn to work under the guidance of experienced plumbers while earning a salary. They typically spend four to five years in an apprenticeship before earning their journeyman status.

Construction Sites

A plumbing contractor works on construction sites to install pipes for new buildings. This requires them to have a thorough knowledge of building codes and standards to ensure the systems they install are up to code. They also work in tandem with other contractors to lay out and connect all the necessary piping for water, gas, sewage, and other utilities. This includes determining the location of water and gas meters, ensuring there are enough connections for the incoming lines, and planning where sewage and waste pipes will go.

Plumbers who specialize in commercial and industrial properties focus on larger-scale projects that require more complex piping systems. These systems must be able to handle higher volumes of water and sewage, as well as meet strict health and safety requirements. Additionally, plumbers who focus on commercial and industrial properties may have to deal with more hazardous materials, such as asbestos.

Whether working on an ongoing building project or installing plumbing for new houses, plumbers are regularly required to perform services that keep the construction process moving along. They must inspect and repair any issues that arise, such as leaky or clogged drains and fixtures. They also make sure that the piping is up to code and adheres to all local regulations.

In addition to these duties, plumbers who are contracted by builders and developers often have to work after hours to repair existing plumbing in new buildings before residents move in. This can include anything from putting in new toilets and sinks to fixing old and worn-out piping. In these cases, plumbers need to have a wide range of tools and skills to address a variety of problems that might occur.

Because most people only live in a home for a few years before moving, residential plumbers spend most of their time on maintenance and repairs. These tasks can include replacing or repairing faucets, toilets, showerheads, and bathtubs, as well as laying out and connecting piping for kitchens, bathrooms, laundry rooms, and more. This work can be fast-paced and demanding, especially when it’s done on an emergency basis.

Plumbing Repair

Plumbers repair and maintain the pipes, fixtures, and appliances that carry water, waste, and heat. They install new plumbing systems in residential and commercial buildings, follow blueprints and building codes to connect the components, and test for leaks and other problems. Plumbers also work on older plumbing systems, repairing or replacing parts as needed. Some common repairs include fixing clogged drains and toilets, repairing or installing water heaters, and addressing issues with water pressure, temperature, or odors.

Most plumbers specialize in one or more types of plumbing repair. For example, some plumbers focus on fixing water heaters, while others may be experts in repairing clogged toilets or sewer lines. Some plumbers even choose to specialise in specific types of plumbing fixtures, such as showers or sinks. This allows them to provide more comprehensive service and expertise when it comes to repairing or replacing these items.

The type of work performed by plumbers depends on the environment in which they are employed. In residential settings, plumbers often work inside the homes of their clients, which can require working in tight spaces and navigating around furniture or other household items. This can also mean working in cold or hot weather conditions, depending on the season.

In commercial or industrial settings, plumbers usually have to work with larger plumbing equipment and more complex piping systems. They can also expect to spend more time on each job than in a residential setting.

For many plumbers, the most important aspect of their work is ensuring the safety of their clients. They must be aware of the potential dangers associated with working with various plumbing materials and tools, and they should always follow proper safety procedures when handling hazardous materials. Plumbers must also be able to communicate effectively with their clients to explain the nature of the plumbing problem and what steps they will take to repair it.

As a result, plumbers need to have a wide range of skills and be comfortable working in different environments. This includes having strong physical fitness, as they frequently use hand tools and other equipment that requires manual dexterity. It is also helpful for them to have good problem-solving skills, as they often have to assess a situation and determine the best course of action quickly.

Plastic Manufacturing

Plastic Mold Injection Process

Injection molding offers a high production rate for parts with precise dimensional tolerances. However, the cycle time for injection molding includes the cooling time as well as the clamping time to close and then open the mold.

Plastic Mold Injection

A molding consists of a sprue to introduce molten plastic and a runner to lead it to cavities that must be filled. Channels built into the mold also direct molten plastic to areas of the part that need to be strengthened. Contact Plastic Mold Injection Process Florida for more information.

Before production can begin, it’s essential to test the mold. This can reveal any issues like warping, incomplete fills, or surface imperfections, and allows the manufacturer to make adjustments before moving into full production. It might take some extra time, but it can prevent quality problems and costly rework down the road.

During this phase, the liquid plastic is heated to its melting point before it’s injected into the mold. The injection process itself is controlled by a number of factors, including temperature, pressure, and the injection speed. Depending on the type of plastic, these factors may be varied to achieve the desired end results.

Once the plastic is injected into the mold, it begins to cool and solidify. This cooling time can cause some shrinkage in the finished product, so the injection and molding processes must be carefully coordinated to minimize this effect.

The injection mold itself is designed with several channels that direct the flow of molten plastic into the various cavities to be formed. The molten plastic initially enters through a channel in the injection mold, known as the sprue bushing. From there, additional channels, called runners, carry the plastic to the cavity images. The sprue and runners must be carefully positioned to avoid any leakage and ensure the proper placement of the molded parts.

Once a runner has filled the required amount of material, it is closed off by a gate, which is also machined into the injection mold and sealed to prevent accidental opening. A portion of the melted plastic in the runners will solidify attached to the part during the cooling cycle and must be trimmed off. This scrap material can then be recycled by being reground into pellets. The reprocessed material can be used in place of virgin materials without negatively impacting the final product’s properties.

Once a good sample of the finished product is produced, it’s time to start making them in bulk. The first few pieces, referred to as T0 parts, will help the manufacturers fine-tune the mold and press settings. It’s important to ensure that all of the necessary adjustments are made before going into full production, because a single problem with the tooling can lead to poor-quality parts down the line.

Injection

The plastic injection molding process is used to create a number of products including kitchen and cooking items, office supplies and toys. It is also the method of choice when production needs are high and dimensional tolerances must be maintained. The ability to produce multiple identical and dimensionally consistent parts in quick succession makes this process ideal for high-volume production.

In the injection phase of the process, the two halves of the mold are closed by a clamping unit and held tightly while the material is injected. A hopper at the top of the injection machine receives raw plastic pellets and then feeds them into a barrel that contains a reciprocating screw. The heating and cooling of the screw – which can be driven hydraulically or by steam pressure – serves to melt the plastic pellets into a molten state.

From there, the molten plastic is conveyed to the front of the mold through a system called a runner and into each cavity through a gate. A sprue (the opening feed that conveys the molten plastic from the injection machine to the runner system) and a series of gates regulate the flow of the melted plastic into each cavity.

Once the molten plastic fills each cavity to a point that is 95%-99% full, it enters a holding stage during which injection pressure is replaced by a holding pressure. This ensures that the molten plastic stays compacted during its cooling phase. The temperature of the molded plastic and the speed at which it cools should be controlled to avoid defects such as blistering, shrinkage or warping.

As the molded plastic cools, a system within the mold helps it release its heat by transferring it to a coolant. The molded part will often shrink during this process, so additional melted plastic is added to compensate.

Once the molded part has sufficiently cooled, it is ejected from the mold. The mold is then reopened and the cycle begins again. The plastic injection molding process relies on the rapid heating and cooling of the molten plastic to form its shape. Therefore, it is important to choose a mold design that allows the plastic to solidify in an even manner. This can be accomplished by using wall thickness that is uniform and avoiding areas that may be subject to pressure changes during the manufacturing process.

Cooling

After a period of time in which the plastic has been molded, it begins to cool and solidify. This is a crucial step, since it allows the plastic to transition from its liquid state to a solid state and naturally shrinks as it does so. This cooling process is also a key factor in determining part quality, as it directly affects the strength, dimensional accuracy, and surface finish of the finished product.

The amount of time that the plastic takes to properly cool is a function of both the thickness of the part and the type of plastic used. Generally, thin sections of the plastic cool faster than thicker ones. Injection molds are designed with cooling channels to circulate coolant, such as water, around the injection mold to absorb and remove heat from the molten plastic. The design of these channels must be carefully analyzed to ensure that the mold can maintain a proper temperature throughout the cooling process.

If the cooling channels are poorly placed, the plastic may not be able to cool evenly. This could lead to warping or other defects in the finished product. Often, the problem can be resolved by adding features to the injection mold that help produce a more turbulent flow of the coolant. These features, called bafflers and bubblers, are fitted into drilled or milled holes in the injection mold. They help create a more efficient cooling circuit by introducing turbulence that allows the coolant to absorb and remove heat from the injection mold more effectively.

Another way to improve the cooling of the injected plastic is by reducing its cycle time, which is the amount of time it takes for the injection molding machine to move from the pack and hold stage to the ejection stage. By reducing the cycle time, engineers can produce more parts in less time and still ensure that the finished products meet or exceed quality standards. This is accomplished by evaluating the complexity and efficiency of the cooling channels, as well as the injection mold’s geometry and construction. Depending on the type of plastic and the mold design, this evaluation can be performed by utilizing simulation software or referring to standard guidelines.

Ejection

The plastic injection molding process must incorporate an ejection system that will properly and safely eject the finished part from the mold. A poorly designed ejection system can damage the product, or result in a defective or incomplete part. The type of ejection system chosen depends on the geometry of the molded product, the material being used, and the production rate desired.

One of the most common types of ejection systems is the use of a series of pins that are fitted into the base plate of the mold inside predesigned indentations. The pins then eject the molded product by pushing against it with enough force to break the seal created between the part and the mold. This ejection system is inexpensive and efficient, but it can leave visible marks on the molded product.

Another method of ejection is through a pneumatic ejector plate system, which uses air pressure to operate a series of ejector plates that push the molded product out of the mold. This system is a good choice for products that require moderate ejection force and take into account spatial constraints. It also provides fast ejection, making it a good choice for high-production applications.

To improve the ejection of the molded product, manufacturers may include design features in the tooling that can be implemented during the injection phase. These include assigning parting lines, removing undercuts, and adding draft angles. By addressing these design issues, the plastic engineer can help to ensure that the molded product will eject correctly when the mold opens.

Once the product has cooled, it is ready to be ejected from the mold. The ejection phase must be completed in a timely manner, so that the molded product can be removed from the injection machine for assembly and packaging. In addition, the ejection phase should leave the injection mold in a clean and ready-to-use condition for the next cycle. If the mold is not cleaned and purged in time for the next cycle, it may cause an undesired warping of the plastic or the formation of defects such as blisters on the surface of the finished part.

Tree Services

Why Tree Removal Is Necessary

Tree Removal Chula Vista is a critical part of landscape maintenance. Whether they’re damaged or dying, unhealthy trees can pose risks to people and property. In addition, diseased and pest-infested trees can spread pathogens or insects to surrounding vegetation.

Professionals gauge the health of a tree through detailed inspections and carefully consider the best method for removal. They also ensure power lines are clear, minimizing the risk of injury or damage during the process.

Safety is a paramount aspect of any tree removal service. It takes many forms, from the proper use of specialized equipment to training and certifications for workers. Moreover, reliable companies take special precautions when removing hazardous trees, such as assessing the risk level of the tree, examining its age and condition, and checking for any power lines or other structures near it. These steps help reduce the likelihood of accidents during the process and ensure that the job is completed efficiently and properly.

The first step involves evaluating the condition of the tree. Any signs of damage or decay should prompt a call to a professional. This includes brittle branches, fungi, and hollow sections in the trunk that weaken the structure. Also, a tree that leans heavily can pose a greater risk.

Once the professionals have assessed the tree, they should remove any objects that could fall on them, such as cars or outdoor furniture. Then, they should make a notch cut and a felling cut to guide the tree’s descent. Finally, they should remove any obstacles from the path of the fallen tree, such as power lines or other structures.

Another important element of safety is to wear the right personal protective equipment, such as ear protection and hard hats. Using the correct PPE will protect workers from injuries caused by loud machinery and help them concentrate on the task at hand. Furthermore, it will prevent injuries from flying debris during the removal process.

A professional tree removal company will carefully plan the work and make sure that they have all the necessary tools and equipment for the job. They will also inspect their equipment before every use, making sure that all the pieces are in working order. They will also take care to keep their workspace free from any hazards, such as tripping or falling objects, and will make sure that their employees are fully trained and qualified. In addition, they will have a clear emergency plan in case of an accident. This way, they will be able to respond quickly and safely.

Health

Trees are vital parts of our environment, supplying shade and beauty, as well as habitats for wildlife. They also play an essential role in preventing soil erosion, improving air quality, and reducing the risk of property damage and injuries. However, despite their importance, there are times when tree removal becomes necessary for safety, health, or structural reasons.

A dead or dying tree can pose a major safety hazard if it falls on people, buildings, or power lines. Moreover, weakened trees can become more likely to fall during a storm or in the aftermath of a wind storm, causing significant damage and costly repairs. Fortunately, tree removal can help prevent these hazards by eliminating the danger and opening up space for new growth.

Moreover, an overly large or damaged tree can cause serious damage to structures, cars, and even people. This can be due to storm damage, age-related decay, or other environmental conditions. A tree that has been damaged by lightning strikes or other natural events may be at increased risk of failure, which can lead to severe injury or death. This is especially true if the tree has a lean or is located near power lines or structures.

Diseases and pest infestation are another reason why tree removal is often needed. These threats can spread to the surrounding ecosystem, affecting nearby flora and fauna. In addition, they can be difficult to treat, resulting in a loss of the affected tree. Fortunately, there are preventive measures that can be taken to protect your trees, including regular inspections from certified arborists.

These inspections will assess a tree’s health, structure, and location relative to buildings, power lines, sidewalks, or driveways. Then, they will recommend the appropriate course of action: treatment, pruning, or removal. An important aspect of tree health is the presence of internal decay, which can be spotted by vertical cracks, seams, or dead branch stubs. Another sign of a serious problem is root girdling, which happens when roots wrap around the base of a trunk and choke off nutrients and water. If left untreated, this can result in the loss of a tree’s crown and root system.

Aesthetics

Trees enhance the landscape, improve curb appeal and offer protection from harmful elements. However, they can also pose dangers when neglected. Regular maintenance and inspections ensure that your trees are healthy and safe. Proper pruning reduces risks, such as damage during storms or interference with structures or utility lines. Thinning, shaping and other horticultural techniques can promote good health and visual appeal by promoting air flow, light penetration and the proper balance of canopy cover.

Choosing a professional company for these services is crucial, as they are trained to assess and mitigate risk while maintaining the aesthetic value of your property’s landscape. Make sure they are licensed and insured in case damages occur or if workers get hurt during the removal process. In addition, they should have a track record of success and excellent customer service.

Cost

There are a number of factors that can impact the cost of tree removal. Some of the most significant include size, location, and the condition of the tree. A larger tree is more expensive to remove than a smaller one, because it requires more labor and specialized equipment. In addition, a taller tree may be located in an area that is difficult to access or close to buildings or power lines, which can increase the risk and complexity of the project.

The type of tree also affects the cost, as some trees have a harder or more dense wood than others. The diameter of a tree’s trunk can also make it more challenging to cut down, as it will have to be cut through a greater width. In addition, the condition of a tree can also add to the cost, as diseased or damaged trees require special care and techniques to be removed safely.

In some cases, tree removal is necessary due to safety hazards, such as those posed by dead or diseased trees that are unstable. In these cases, the risk of falling branches or an entire tree is much higher than that posed by a healthy tree. In addition, a rotting or damaged tree can create an unsafe environment for children and pets.

Another common reason for tree removal is to clear space for construction or landscaping projects. This can be a very complex job and is often best left to the professionals. If a tree is removed to make way for a building, road, or utility line, it must be carefully dismantled and then cleared of debris.

If you are looking for a professional to remove your tree, it is important to ask for an estimate and discuss any potential complications with the company before hiring them. They should have the proper training and equipment to handle any tree removal job safely. Additionally, a reputable company will be licensed and insured. Ask for references and check online review platforms to find a company that has earned a good reputation.

Home Services

Mold Removal – What You Need to Know

Mold growth only requires two elements: moisture and a food source. To prevent mold, properly ventilate and ensure any leaks are repaired immediately.

If you find green or black mold on your walls, scrub it with water and bleach. This will eliminate most spores and mold. Contact Mold Removal Salt Lake City now!

Mold thrives in rooms that contain a lot of moisture and certain scenarios increase the potential for fungus to grow, such as leaky pipes, plumbing issues, storm damage or poor ventilation. These conditions may cause water or humidity to accumulate, which provides a perfect environment for mold to grow and spread throughout your commercial property. A trained mold removal specialist can help identify the problem and create a course of action to clean the affected area, decontaminate contents and prevent future contamination.

Observe for visible signs of mold, such as dark spots or splotches, especially in areas that are often wet, like bathrooms, basements or kitchens. Mold has a distinctive blossom-like appearance and can appear in different colors, including black. Look for yellowing and fuzz-like growth on fabrics, wood paneling or Sheetrock.

The presence of a musty, earthy or musty odor is another common indicator of a mold issue. Mold volatile organic compounds, or MVOCs, can cause a variety of symptoms, including fatigue, respiratory issues and watery eyes. If you or your guests experience these symptoms while in the home, it could indicate that a mold problem exists and is present in other areas of the house, such as behind walls or inside insulation.

When spotting any sign of mold, make sure to wear rubber gloves and mask when handling or scrubbing the area. Use a brush, scrub pad or sponge to clean the affected area, scrubbing as you go. Scrub until all visible mold has been removed and let the area dry thoroughly.

After scrubbing, disinfect any areas with mold and a diluted bleach solution of 1/4 cup bleach per gallon of water. Make sure to handle bleach with caution and use a well-ventilated area. If any spotting remains, wipe the surface with a damp cloth and dry completely.

If you’re unsure of the type of surface you’re cleaning, it is best to test for compatibility with any chemical cleaners that you choose to use. Check the label of your chosen product to ensure that it’s designed for your specific surface and is either a mold killer, a mold cleaner or mildewstat.

Identifying the Source of Moisture

Mold requires two elements to grow: moisture and a food source, usually organic material like cotton, leather or cellulose (found in wood and paper). Since these are common materials used in homes and offices, mold can easily find a home in the walls, carpets, ceilings, and furniture of any property. But mold growths can also be a result of a more serious issue such as a leaky roof or faulty air conditioning system.

The best way to spot mold is to look for a musty or earthy odor in the affected area. The smell will be stronger in areas with a higher humidity level and if there’s no ventilation. But there are other signs too, such as allergy symptoms. These might include a runny nose, itchy eyes or throat, or a feeling of being suffocated.

Molds spread by releasing tiny reproductive cells called spores that circulate in the air. They can be carried from one location to another on the clothes, shoes and bags people wear or by pets. They can also be blown from one place to another by heating and cooling systems and through open windows.

If a mold problem isn’t too big, a homeowner may be able to clean the surface of the affected area with soap and water. But if the mold is a lot worse, or if it appears in a previously flooded area of a building, then professional help will be needed.

When the source of the mold is identified, it will be easier to treat and prevent future outbreaks. If the mold was caused by a leaking roof or damaged air conditioner, then the appropriate measures will need to be taken to fix the problems and prevent water from entering the house.

On the other hand, if the mold was caused by flooding, then the flooded area will need to be dried out. This can be a difficult task and will depend on how deep the mold was embedded inside the wall. If the mold has reached the drywall, then it will probably need to be removed and professionally cleaned.

Identifying the Contaminated Materials

Mold is often thought of as a nuisance, but it can also be toxic. It thrives in dark, damp environments and spreads its spores into the air, where they can be breathed in by inhabitants of the home or office. Some types of mold spores can trigger respiratory problems and allergic reactions in sensitive people.

Taking precautions when working with mold removal chemicals or cleaning the area can minimize these effects. Always wear gloves, safety glasses and a mask when handling mold. Make sure that the work area is separated from the rest of the building by plastic sheeting and cover air supply and return vents. It is a good idea to use a negative air machine with HEPA (high efficiency particulate air) filters to filter out any spores that might become airborne during the cleanup process.

To begin the mold removal process, first locate the source of moisture. This may involve a thorough search of the house including behind walls, in the attic, under sink cabinets, in crawl spaces and other areas that are not normally accessed. It is important to fix the moisture problem so that future mold growth can be prevented.

Once the source of the moisture has been located, a number of different cleaning methods can be used depending on the type of mold. Mildew is usually a fairly simple problem to resolve, and can be wiped away with household cleaners and scrub brushes. If the mildew is on porous or absorbent surfaces, such as drywall or carpet, it will need to be scrubbed and sprayed with a solution of 3% hydrogen peroxide and undiluted white vinegar, then rinsed and dried.

Other types of mold can be much more difficult to remove, especially if they have penetrated the surface and grown into the structure of the building. In these cases, it is typically necessary to hire a professional mold remediation company. They will be able to advise you of the best course of action for your specific situation. For example, if the mold has gotten into the studs of the building it is likely that they will need to be removed and replaced.

Purging the Contaminated Materials

Molds are fungi that can grow anywhere they find water and food. They can contaminate surfaces in homes and buildings, cause damage to them, and irritate the skin, eyes, nose, and throat of people who live or work in them. Some kinds of mold also produce toxic compounds that can wreak havoc on the human body, triggering allergies and asthma attacks.

Mold growth often occurs inside walls, making it difficult to spot unless you know where to look. If you suspect that there is a problem, check for earthy odors in the home, allergy symptoms that clear up when outside, and stains on the walls themselves.

Once you have isolated the area, it’s time to address the problem. A mold expert will use specialized cleaning products and techniques to clean all visible signs of contamination, as well as any underlying roots that might have survived the first attempt at removal. It is important that these spores and their toxins are killed to prevent future outbreaks.

After all visible areas are cleaned, the building materials need to dry out completely. This can take a while and may require fans or dehumidifiers to help speed up the process. In some cases, contaminated building materials will need to be replaced.

A mold test should be run after the remediation process to ensure that all spores and toxins have been killed. The results of the test will help determine whether the building is safe for habitation once again.

The most common types of mold found in residential buildings are black, pink, green, and white. Black and pink mold are typically associated with rotting vegetation, while green and white molds grow on organic material such as paper, cotton, and leather. White mold can be a sign of sewage infiltration or air-conditioning problems.

Mold is a natural part of the environment and cannot be eradicated entirely. However, if you follow these steps, you can minimize its impact on your home and health by taking precautions against moisture buildup. It is best to check frequently for condensation and leaks, fix broken seals, open windows, and leave doors open to let in fresh air.

HVAC

AC Repair – Understanding the Components of Your AC

Keeping your air conditioning unit in good working condition is about much more than comfort; it’s about health and safety. For vulnerable groups like children and elderly people who lose body heat more quickly, living without a functioning AC can pose serious threats.

AC Repair

A professional technician like AC Repair Round Rock TX can spot problems that are easy to fix and help prolong your unit’s lifespan. Some of the most common AC problems include:

Imagine your air conditioning system as a classic Southern jam session, with each component performing its own unique part to produce that cool, comforting country tune. A vital piece of this puzzle is refrigerant, a chemical that transfers heat from your home to the air conditioner’s condensing coil. When refrigerant levels aren’t optimal, the entire system feels the strain. This could lead to visible and audible signs of failure, like low cooling capacity, inconsistent airflow, or even complete system breakdown.

A good AC repair professional will perform a thorough inspection to check for the presence of leaks and other issues that affect refrigerant levels. Most maintenance sessions include a recharge of the air conditioner’s refrigerant, which helps ensure peak performance and optimum efficiency from the equipment.

During the process of pumping refrigerant through your air conditioner, a small metering device updates the electrical information that lets your system know how much refrigerant is moving and whether it needs to keep working to achieve your chosen temperature goal. If there isn’t enough refrigerant, your compressor may overheat, and eventually burn out. This is a costly AC repair, and one that will likely require replacement of the compressor assembly.

Low refrigerant levels also cause the evaporator coil to freeze, restricting airflow and further heating your indoor air. This issue will need to be addressed promptly to prevent more serious repairs and to avoid the potential environmental hazards associated with refrigerant.

Refrigerants have specific handling and disposal rules that must be followed to protect the environment and your air conditioner. Only licensed HVAC professionals can purchase and handle these chemicals, and they must be trained in the proper ways to repair leaks and recharge systems with refrigerant. Failure to follow these regulations can result in additional damage to your system and penalties from the EPA.

Getting regular preventive maintenance through an air conditioner tune-up is the best way to stop refrigerant leaks before they happen. A qualified technician will be able to check for the presence of leaks, repair them quickly and effectively, and recharge your AC with the correct amount of refrigerant to restore its optimal performance.

Condenser Coil

The evaporator coil and condenser coil are crucial components of your AC unit. They play a pivotal role in the cooling process, and homeowners need to understand their function and significance in order to keep their AC units working properly.

Coils are made of copper or aluminum, and they facilitate the heat transfer process. The refrigerant enters the evaporator and condenser coils in a high-pressure gas form. They are then designed to release this heat, converting it back into a liquid state so that it can be used again to cool your home. This process is essential to the energy efficiency of your air conditioning system.

If your evaporator or condenser coil becomes dirty, it can have a negative impact on your system’s efficiency. Ideally, you should hire a licensed professional to clean your evaporator and condenser coils on a regular basis. This will help prevent the coils from becoming clogged with debris and inhibiting the heat transfer process.

A dirty evaporator and condenser can also lead to hissing or bubbling noises, ice on the coils, and poor cooling. If the issue is severe, the technician may recommend replacing the coil.

While a professional can replace your coil, it is often more cost-effective to fix the underlying problem that caused it to become damaged or dirty. This is especially true if the damage or dirt was the result of a more significant issue like a refrigerant leak, fan problems, or electrical failures.

A licensed professional can repair the problem by examining it, repairing any broken or bent fins, and cleaning the coils. They can also relubricate the fan motor and replace a faulty relay switch, if needed. While you can do some of these tasks yourself, it is best to leave the replacement and repair of your AC’s coil to a professional. An experienced and reputable technician will ensure that your air conditioner’s coil is clean, and they will work with you to create a maintenance plan that includes regular cleaning appointments. This will ensure optimal performance and extend the life of your air conditioner.

Compressor

The compressor is a vital part of your air conditioning unit and the heart of its cooling processes. It distributes refrigerant across the indoor and outdoor coils for heat exchange. If it starts to malfunction, other parts of the system will suffer and the entire AC may break down.

A broken compressor can be expensive, but it’s often less costly than a complete AC replacement. You can avoid expensive repair bills and premature breakdowns by recognizing the signs of an AC compressor problem early on.

One of the most obvious warning signs that your compressor is starting to wear down is poor cooling performance. When your AC struggles to keep your home cool, it will use up more energy and run longer than normal. This means your electricity bill will spike and you’ll likely notice strange noises coming from your system.

Another way to detect AC compressor problems is to check for dirty condenser coils. If these coils become covered with dirt, dust, pet dander, algae, and other contaminants, they can hinder the heat dissipation process and force the compressor to work harder. A dirty coil can also lead to an overheating problem, which can cause the compressor to shut down.

If you notice these warning signs, schedule an AC service right away to inspect and clean your condenser coils. A professional technician can also perform a diagnostic test to assess the condition of your compressor. If the test results show physical damage or oil leaks, you’ll need to have the compressor replaced.

The compressor is a critical part of your air conditioner, but it can wear down with regular use and a lack of preventative maintenance. By following the recommendations for AC compressor care provided by your technician, you can extend the life of this key component and avoid expensive repairs and premature breakdowns.

Fan

The fan is the main part of your AC system that spreads cool air throughout your house. It pulls air over the evaporator coil, taking heat from it, and then pushes that cooled air through your ducts to cool the rest of your home. If your AC fans don’t work properly, the cooling process will be hampered.

Generally, electrical issues like a broken capacitor or control board are the most common reasons for AC fan problems. But mechanical troubles like a worn-out fan motor, things blocking the blades, or damage to the bearings can also stop your AC fans from working well.

If you notice your AC fan making weird noises or stopping altogether, the first thing to do is check your house’s circuit breaker to see if it was tripped. If it was, shut the breaker off and call an HVAC expert right away. It’s better to let an experienced professional find and fix the problem quickly rather than attempting DIY fixes that could cause more harm or make things worse.

In some cases, an HVAC technician will advise you to replace your AC fan. This will help it last longer and keep it from needing repairs, especially if you’ve been using it for many years. Then you can switch to a newer, more energy-efficient model for even greater savings on your utility bills.

Keeping up with regular upkeep, like having your air filters cleaned, is a good way to avoid most AC problems. However, the occasional need for a quick repair or even an upgrade to a newer model is still likely. An experienced HVAC worker can quickly spot the problem and recommend the best course of action – whether it’s a simple do-it-yourself fix or a bigger system update for long-lasting performance. And they’ll take care of the job quickly and efficiently so you don’t have to deal with any discomfort while it’s being fixed. A good technician will always be honest with you about the pros and cons of different options. This ensures that you get the solution that is best for you.

Electrician

Wiring Electrical Outlets

Your home’s electrical outlets are the lifeblood of your electric system. Over time, they become worn out and need to be replaced with new outlets. When it comes to upgrading your electrical outlets, it’s not only a safety issue but can also save you money on your energy bills.

One of the most common electrical outlet upgrades is the addition of GFCI outlets in kitchens, bathrooms and laundry rooms. These outlets are designed to protect against shocks and shut off if they detect moisture, which can help prevent electrical fires. Contact Jacksonville NC Electric now!

An upgrade to your home’s circuit breakers can also greatly improve the performance of the electrical wiring (those vital arteries mentioned earlier) throughout your entire house. You might want to add dedicated circuits for large appliances like refrigerators or air conditioning units, or simply put in a few extra breakers if your existing ones are only rated at 15 amps.

Your circuit breaker is the heart of your house’s electrical system, with each individual breaker connected to a specific set of outlets. If you open up your breaker box, you’ll often find numbers and masking tape that indicate which room or areas of the house each breaker powers. If you have a 20-amp wall outlet plugged into a breaker that is only rated for 15 amps, it won’t just trip the breaker; it will literally start to melt the wires inside the breaker box, and you could end up with an electrical fire in your home.

A qualified electrician can easily upgrade your home’s circuit breaker to 200 amps, which will be more than enough to handle the demand of modern devices and appliances. In fact, many homeowners in Northern Virginia who experience flickering lights, constantly tripped breakers or only have two-prong outlets will benefit from having their homes upgraded to this amperage level.

USB Outlets

You’re likely familiar with wall outlets that include USB ports — they’re becoming more common in public places like airports and coffee shops. Aside from the fact that they look sleek and modern, they’re a convenient way to avoid cord clutter in your home. A USB outlet simply plugs straight into the wall where a standard outlet would normally reside and is accessible to all your devices that use a USB charger, such as tablets, phones, laptops, smartwatches, or electric toothbrushes.

When choosing a USB outlet, it’s important to consider the amount of power each port can provide to ensure the safe operation of your devices. You’ll also want to select an outlet that is UL listed, respects National Electrical Code standards, and is tamper resistant.

For safety purposes, it’s always recommended that you hire a licensed electrician to install any outlet upgrade, including those that incorporate USB ports. Before beginning, it’s essential to turn off the breaker for the outlet you’re replacing at your circuit breaker panel and verify that there is no electricity running through the existing outlet by using a non-contact voltage tester or by plugging in an electrical device. You’ll then remove the old outlet and wire and connect your new receptacle outlet, following the manufacturer’s instructions.

Once your new USB outlet is connected, you’ll need to switch the breaker back on and test it again to make sure no current is flowing through it. You’ll then screw the new outlet cover plate back into place and restore power to your home.

In most cases, installing a USB outlet isn’t a difficult task for someone familiar with basic electrical work. It’s best to consult a professional, however, if you’re inexperienced with replacing outlets or are concerned about whether your home wiring can support the additional amperage required by an upgraded outlet. In most instances, this will mean upgrading your existing wiring to accommodate the higher amperage. In some cases, this may also involve adding a new junction box to house the increased amperage. In either case, an electrician can assess your wiring and recommend any necessary upgrades.

CAT6 or CAT7 Ethernet Cables

The wires connecting your devices to your network can be upgraded at a relatively low cost. CAT 6 or CAT 7 Ethernet cables can handle current and future speed requirements, enabling you to enjoy faster gaming, streaming, and other applications. These cables provide more protection from interference, as well. The twisted pairs of copper in each cable are insulated from each other, significantly reducing noise and crosstalk. These wires also have a thicker diameter and are more difficult to cut down than CAT 5 or CAT5e wires. The added thickness and rigidity make them more expensive to install. Choosing the right cable is an important part of a home network upgrade, but it’s also necessary to consider how often you plan on upgrading your devices or changing your technology setup.

Currently, most ethernet cables used in homes are either CAT5e or CAT6. The former supports speeds up to one Gbps per second at 100 MHz and can be run up to 328 feet. The latter offers speeds up to 1000 Mbps at 250 MHz and has more reliable performance. Using these cables is sufficient for most home applications, but it may be worth upgrading to a higher standard if you’re planning on installing more advanced equipment.

Both CAT6 and CAT7 offer superior bandwidth and protection from interference. They are backward compatible, meaning you can continue to use your old hardware with these new cables. CAT7 provides a more robust connection than CAT6 and allows for up to 10 Gbps at 600 MHz. It has increased durability and a longer life cycle, making it a better choice for people who anticipate having to rewire their homes in the near future.

The difference between CAT7 and CAT6A is that the latter is augmented with additional shielding for each of its twisted pair. This helps to eliminate alien crosstalk and improves transmission quality. CAT7A is more expensive than CAT6 and should only be installed when the full advantages of this cable are needed, such as for data centers or high-performance networks. It isn’t practical for most home users, especially those who are less likely to regularly upgrade their technology.

The Big Three Wiring Upgrade

Adding high-powered car audio systems and other aftermarket accessories can put a strain on your vehicle’s original wiring and charging system. This can cause problems like dimming headlights, voltage drops and even damage to your battery or alternator. To avoid these issues, you can upgrade the Big Three wires in your car.

Upgrading these three crucial wires is an easy, affordable way to improve your overall driving experience. You can use larger gauge wires to reduce resistance and increase current flow. These upgrades will also protect your equipment from electrical failure and help it last longer.

The Big 3 Wiring Upgrade consists of replacing your factory battery ground wire, engine block ground wire and alternator power wire with larger versions. These upgrades will allow for increased current flow, less voltage drop and better conductivity. When paired with a high-output alternator, this wiring upgrade will give you enough juice to power your audio system without stressing your battery or other systems.

To perform the Big 3 Wiring Upgrade, you’ll need a handful of essential tools and supplies. First, you’ll need a heavy-duty cable capable of handling the increased electrical flow to your audio system. You’ll also need a pair of wire cutters, plastic cable ties for organization purposes and a soldering iron or torch to make the necessary connections. Finally, you’ll need heat shrink that matches your AWG and ring terminals/lugs for your new cable.

Once you’ve obtained these items, you can begin the installation process. Begin by locating your factory ground wire, which will be running from the battery to the chassis. If your car has a ground strap that runs from the engine block to the frame, you’ll need to grind away any excess paint on the frame to ensure it can accept the new, larger ring terminal.

Next, you’ll need to remove the positive battery terminal and the alternator power wire from the negative terminal. You’ll then connect your new cable to the positive battery terminal and the alternator power terminal. Ensure that the new wire is connected securely and that there are no exposed metal components.

Home Services

Choosing Deck Builders

Deck Builders Lexington KY is responsible for the design and construction of outdoor living spaces. They work with clients to understand their vision and space, proposing creative solutions and building materials.

Builders collaborate with clients to provide accurate cost estimates and manage expectations throughout the process. This ensures that the project remains cost-efficient and avoids costly mistakes.

A well-crafted deck not only elevates a property’s aesthetic appeal but also complements the architecture and landscaping, creating a harmonious space that blends indoor comfort with nature. It is a great spot for entertaining, relaxation, and dining and is a major investment that should be treated as such. Hiring a professional to build a deck ensures that the project is done correctly and safely. Hiring a cheap, unlicensed builder is often a risky move that can lead to expensive repairs and legal issues down the line.

A licensed deck builder will work closely with homeowners to create a design that suits the property and their lifestyle. They will assess the outdoor space and incorporate the necessary features to maximize usable area, provide privacy, and enhance the curb appeal of the house. They can also incorporate key elements such as deck lighting to allow for nighttime use. Additionally, they will take into account the overall aesthetic and architectural style of the home to ensure consistency.

Professional Deck Builders are well-versed in local construction codes, which are necessary for building a safe and structurally sound deck. They will also secure the necessary permits and inspections to ensure compliance. If they encounter any problems during the construction process, they will communicate them immediately to avoid any delays or unnecessary expenses.

Licensed deck builders are trained to build a high-quality composite deck that stands the test of time. They will use specialized tools, such as custom jigs, to ensure that the final result is flawless. They will also know which materials are best suited for different climates and weather conditions to ensure durability. They will help homeowners choose the right material for their deck and can offer advice on other aspects of the construction process, including cost and timelines.

Deck Builders are used to working with a variety of different clients and projects, so they have the expertise to complete the job on time and within budget. They will work with you to select a suitable design and will provide detailed proposals, estimates, and timelines for your approval.

Experience

A deck is a significant investment in your home. As such, it is important to select a contractor with the right amount of experience and skill to ensure that the project will be completed successfully. Experienced builders will be able to quickly recognize and resolve challenges, and their expertise will ensure that your deck is safe, sturdy, and long-lasting.

When interviewing potential contractors, look for a comprehensive portfolio of past projects and ask about specific projects that are similar to yours. You should also be able to visit completed projects if possible, which will give you an idea of the contractor’s craftsmanship. A high-quality portfolio and positive reviews from previous clients are good signs that the contractor will do a great job on your project as well.

A qualified contractor will understand your vision and help you to bring it to life, adding value to your property while creating an enjoyable outdoor space that will be enjoyed by your family for years to come. They will also provide you with a detailed project proposal, including pricing and a timeline for completion. Additionally, they will handle permit paperwork and other administrative tasks to save you time and hassle.

Streamlined Construction

A professional builder’s extensive experience allows them to streamline the construction process, eliminating wasted time and cutting costs. They will work efficiently to ensure that your deck is constructed according to your specifications and within your budget. Furthermore, they will minimize the risk of costly errors and delays by utilizing best practices.

Creative Solutions

An experienced deck builder will be able to offer you creative solutions that will improve your outdoor living space. They will suggest practical and aesthetic elements to add functionality and appeal to your deck, which can improve its overall appearance and value. They will also be able to recommend materials that will best suit your lifestyle and budget, while maintaining a strong level of durability.

Your backyard should be a relaxing and tranquil place where you can enjoy the beautiful surroundings of Ringwood. The area features a serene blend of suburban comfort and natural beauty, offering pristine lakes, hiking trails, and historical sites like Ringwood Manor. A reputable Ringwood Deck Builder will be able to create a custom outdoor space that will harmonize with the surrounding landscape and enhance your home’s aesthetic appeal.

Reputation

When choosing a Deck Builder, make sure that you check out their reputation. This can be done by looking at online reviews, testimonials, and ratings. This will help you select a builder with the best track record and customer satisfaction. This will also give you peace of mind during the construction process.

In addition to checking a builder’s reputation, it is important to look at their past work and certifications. This will ensure that they are qualified and licensed to do the job. Moreover, they should adhere to local building codes and regulations. A professional contractor will be able to provide a detailed contract and will explain all the details of the project.

A good Deck Builder will take pride in their work and have an excellent track record. They will use high-quality materials and work with you to design a custom outdoor space that fits your needs. They will also provide you with a free estimate and consultation.

This company is a leading provider of custom outdoor decks, composite and wood porches, pergolas, and outdoor kitchens. The Deck Guy of Long Island uses a wide range of wooden, composite, and PVC decking materials. They also offer custom railing and lighting installation, including stair lights. In addition, they provide deck maintenance and repair services.

The Deck Guy of Long Island is a family-owned and operated business that provides residential deck construction services in New York City. They can install wooden, composite, and PVC decks and gazebos. They can also install custom fencing and railings as well as wrought iron fences. They have been in business for over 25 years.

When choosing a deck builder, you should look at their experience, craftsmanship, and warranties. A reputable deck builder will be focused on their projects until they are finished and will address any issues promptly. In addition, they will have a comprehensive portfolio that showcases their experience and expertise. Those searching for a deck builder should also consider the location of their company. They should be close to your home so that they can easily visit your property and complete the project within a reasonable time frame.

Insurance

As with any type of construction job, there are always risks involved with building a deck. The good news is that liability insurance for deck contractors protects you and your company from a financial disaster should an accident or injury occur on the job site. It also covers legal fees and compensation claims should someone sue you for damages related to your work. When evaluating potential deck builders, it’s important to ask about their insurance coverage.

Look for a contractor with comprehensive insurance coverage and a valid business license. It’s also helpful if they have experience in the industry and professional affiliations with other companies. These factors can indicate their knowledge of the latest in building technology, code compliance, and best practices.

Aside from checking for licensing and insurance, it’s also a good idea to ask potential builders about their past projects and to request references. Then, ask for a transparent contract and proposal that clearly describes project timelines and costs. This will help you determine the level of workmanship and professionalism to expect from a particular company.

Licensed builders have extensive experience in the field and can provide you with a high-quality finished product. They are also knowledgeable about local building codes and can obtain the necessary permits for your project. This ensures that your deck is built properly and complies with all regulations, protecting you from possible future issues like warranty problems.

Another thing to consider is whether a potential contractor has completed operations coverage. This is a special facet of general liability that provides protection after a project is complete. If a client notices property damage months after the project is completed and links it to your work, this type of insurance will cover the legal costs and compensation claims.

When it comes to hiring a deck builder, you want to choose a professional who will take care of your home and provide exceptional work at an affordable price. Beware of unlicensed contractors who may not have the skills or expertise needed to build a quality deck. They could cost you more in the long run with repairs and safety hazards.